Showing posts with label Holiday Projects. Show all posts

Printers Tray Project


Hi Everyone!  Are you ready for Christmas?  I've got just a tiny bit of wrapping left, and I've got cut-out sugar cookie dough chilling right now!  I'm going to try making snowflake cookies and then decorate them.  Okay, I know for some of you that's not a big deal, but I am more of a "scoop and bake" kind of girl!  So I'll let you know how it goes...

Anyway, I told you I'd show you the project I did for the gift exchange at my upline, Mary's holiday party.  A few months ago Stampin' Up! had a promotion for demonstrators that recruited new demonstrators.  They could earn these kits that included one of these very trendy printer trays.  It was a Halloween collage, and absolutely adorable!  However, I didn't recruit anyone, so I wasn't eligible for a kit.  But, my dear friend, Deb, did recruit and not only did she get a tray, she was then allowed to purchase some more!  So she very generously let me buy a couple from her, and we even worked on a Halloween one when I went to visit her back in October.  Then we go the idea that we could do inserts for more holidays.  And here's what I came up with...

This is my Halloween tray.  It's a bit different from the one Stampin' Up! designed, just because I didn't have all the right stamps and supplies.  Some of the squares are done with My Digital Studio, and some are stamped, punched, etc.  I also used designer paper.  The cool thing is that each square is mounted on thin cardboard and a magnet sheet is attached to the back.  There is also a magnet sheet attached inside each square of the printer tray, so when you put the squares in, they don't fall out!  Deb is a genius!


Next is the Fall tray.  Once again, I used My Digital Studio plus stamps, etc.  Deb has sent me a different version of this but I had to tweak it a bit since I didn't have the same stamps she did.  But I think it turned out really cute.  I did use some retired designer paper (don't tell anyone!).


And finally, here is my Christmas tray.  I love this one, probably because it's so festive and a bit sparkly!  And I know what you're thinking, "let's do this as a class!"  Well, I can't because I don't have access to these trays!  However, if and when Stampin' Up! does sell them to all demonstrators, I will definitely take it under consideration!  I have seen something similar in the craft stores, but either there are way too many sections and they're too small, or they're all the same size, which takes away a bit of the design element.  We'll see....


I hope you enjoyed this project!  Merry Christmas!

Holiday Gift Exchange


Each year I get together for a holiday party with my upline and her group, and another party with my own downline.  We do a gift exchange, and it's a lot of fun.  The gift has to be something handmade using Stampin' Up! product.  I am going to show you 6 of the items that were in the exchange this year!


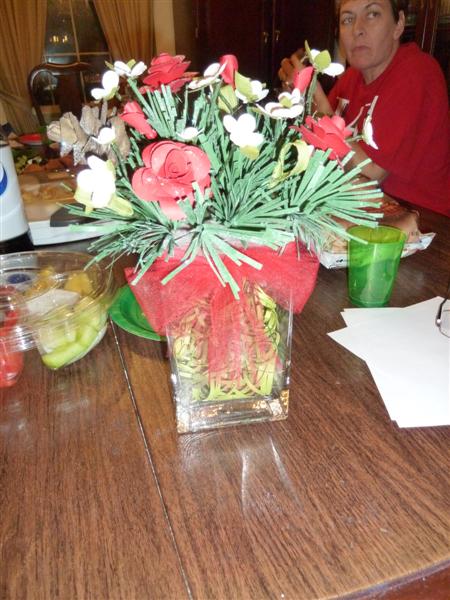
The first one is a paper flower arrangement in a glass vase.  My upline, Mary, made this and I don't want to know how many hours she spent on it!


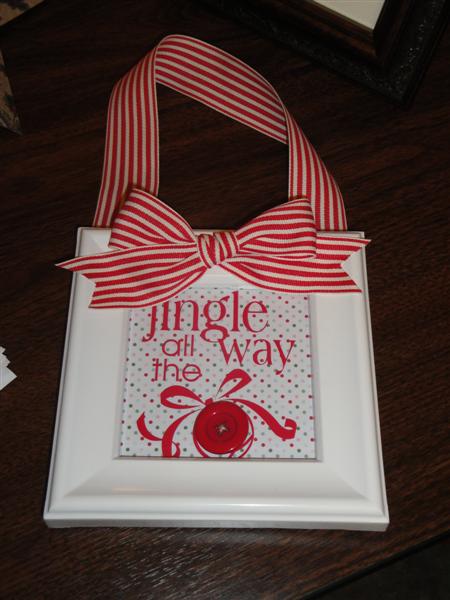
The next one is a framed picture with a holiday theme.  Very cute!


And obviously these frames are very popular!  I love this one made by Angela.


The next project is the one I got at my downline party, created by Pam.  These printer trays are also trending right now, so cool!  She used a cherry blossom theme.  Reminds me of spring!


This adorable purse was made by Toni.  She is quite a talented seamstress.  It even has a zipper pocket inside, and a magnetic snap.


And this is the tote bag I made for the gift exchange with my downline.  I used the Floral District fabric, and I put pockets on the inside.  No pattern, just lots of straight stitching!


And of course I forgot to take a picture of the gift I got at Mary's party, and the gift I brought to Mary's party!  So once I take some photos of that, I'll post them.  Thanks for checking in!


I'm Back!!! and my "Noel" Class project

Hello!  Yes, I know, it's been almost a year since I've posted.  Where does the time go?  It's been a busy year, and I've just recently done some reevaluating of my priorities, so I am hoping my blog will come back up to the top of the list!  The best way to see if I'm posting is to subscribe to Inky Images.  Just add your email in the prompt on the right, and you can do just that.  I will also be posting my events, so you won't want to miss it.

Today I want to share with you the project we did at my "Noel" class last month.  This project was inspired by my stamping friend, Angela.  She made a similar frame last year (you can see it in the post just previous to this one), and so many people admired it, I decided to do a class.  I had to slightly redesign it, since some of the elements and papers were retired. But I am happy with the way it turned out.  I ended up prepping for 40 of these, which was kind of crazy!  So just in case you were thinking of asking if I would do some more, the answer would have to be "no"!

Holiday Gifts #4


My last post with our Holiday Gifts!

This next one was made by Angela and I was lucky enough to get this gift at Mary's party. I immediately brought this home and hung it in my foyer. Isn't it fantastic? I would love to make some more of these as they would be great gifts for next year. The little felt snowflake, wreath and mittens can be found in the current Holiday mini catalog, which means they will be gone as of January 3. So if you want some, be sure to order them right away. They are called "Winter Wishes" and are on page 30 in the mini. I will give you the link at the end of this post. The scallop squares are done with a Big Shot die, as well as the big letters. Other punches and dies are used as well. What a great project!


And I love this picture too! This was made by Stacey. My favorite part of this project is the rosettes, which are done with punches and scoring.


And this is the gift I received at my downline party. These are magnets created by Courtney. Soooo nice! She stamped them on tiles and colored in the flowers. She blinged them up with gloss and glitter and added magnets to the back. Love it!


And finally, here is the gift I made. It's a magnet board, and the 3 snowflakes in the center are magnets made with paper and crystal effects. I bought the painter's canvas, unstapled one end so I could slide a metal piece behind it, then restapled. Then I stamped and sponged with Craft ink and stapled on a ribbon. Pretty easy, and lots of fun.


Okay, don't forget that the Holiday mini catalog ends on January 3. If you want anything from it, let me know and I can order it for you. (email me at Sue@WeLoveToStamp.com). Or you can go to my website at http://suehyer.stampinup.net, and go to Shop Now. You can also view all the catalogs, including the Holiday mini at the same place. Just click on Products and then Catalogs, and it will take you right there. Also, we just found out that Stampin' Up! will be discontinuing the Stocking Builder Punch and the matching Stitched Stockings stamp set, which are in the Holiday mini too. I was quite surprised about that, I never thought they'd retire a punch after just 4 months! So if you were thinking it would be in the big catalog this summer, that's not going to happen. Order those things now before it's too late!

Happy New Year!

Holiday Gifts #3


Another round of Holiday Gifts!


This is gorgeous! How clever to create a wreath using a flower die! The colors are so bright and cheery, you really could display this all year long. Pam I. made this.


Another use of our Flirtatious fabric! Toni is quite a seamstress, and she really wowed us with this adorable dress form. It could be used as a pin cushion, or even to hang jewelry on. I think it's just cute to look at too!


And what can I say about this amazing lamp?! It's beautiful, created by Mary. She used some brand new items that will be found in the Occasions mini catalog next month, including designer paper, a Big Shot die, and the pleated ribbon.


And here is an awesome memo board, complete with magnets, memo pad and even a little basket to hold pens, etc. I love this idea!


One more post tomorrow with the last four projects! See you soon...

Holiday Gifts #2


Time for some more holiday gifts!

This first one was done by my upline, Mary, who is definitely one of the most creative people I've met! This was a much coveted gift, as you can probably tell! I'm sure it took her hours to make and I doubt she'll ever make another one. It involved folding more paper flowers than you'd ever want to count and then attaching them to a styrofoam ball. She then put it all into a vase. Isn't this gorgeous?


The photo above is a really cute and really big ornament! Attached to the ball are tons of buttons and then mica flakes were added for the bling!


And the next gift is an origami folded Christmas tree! How clever! Don't ask me how she did it, I don't have a clue!


And the last one is an Advent calendar. All the flaps open to reveal "How many more days till Christmas"!


There will be more to show you tomorrow!

Holiday Gifts


Every year our Stampin' Up! groups get together for a holiday party and we have a gift exchange. We have to bring a handmade gift and we need to use SU! product to make it. Over the next few posts, I want to show you the gifts that were at both Mary's party (she is my upline) and at my downline party. These girls are VERY creative!!!

The first one I made, and it was really very easy. It's a card or photo display board. You just slip the cards under the ribbons and they stay. I just took a canvas (the kind you'd paint on) that I got at the craft store and attached the fabric and ribbons to that with a staple gun. First I laid some batting onto the front, then laid that and the canvas on top of the fabric. By the way, the fabric is from the "Flirtatious" set. I stretched it so it was tight, then stapled all the way around. To add the ribbon, I just lined it up, pulled it tight, and stapled. And then I just sewed the Bitty Buttons on by hand with the White Baker's Twine. So easy! I plan to make some more of these, including one for myself!


The gift in the photo above is a beautiful serving tray. I'm guessing it was stamped with Stazon and colored with markers. You'd probably have to seal it with something so the images don't rub off.


This next gift took a long time to make, I am sure of it! I didn't make it, but I think she cut all different widths of designer paper, scored them and then stacked them to make a tree. Hopefully she used the Simply Scored tool to make the job a little easier!


And the last one for today is this beautiful handcrafted picture. Lots of punches were used, and I especially like how the lace ribbon punch was turned into a snowflake.


Stay tuned over the next few post to see the other great gifts!

Holiday Gifts Continued...

Here come the last our our holiday gifts! This first item is a little purse I made for my upline, Mary. I cut out all the pieces, except the handle, using Big Shot dies. I put quilting batting in between the inside and outside layers and stitched everything together. It was actually pretty easy to make!


Yes, we do have some seamstresses in our group! This apron was done by Essel Linton. She purchased the apron, took off the original pocket, then made her own pocket using our designer fabric. The accent flower is done with a Big Shot die.


And this memo board was made by Mary Hall. She covered a magnet board with designer paper, and Mod Podged it. The circles are magnets, and then she attached a memo pad. This gift was a big hit!


More Holiday Gift Ideas

Time to show you some more projects from our holiday gift exchange. The first thing is a ribbon wreath, that was made by Linda Bobb. She bought one of those wire wreaths, then proceeded to tie ribbons on it. I think she said it took her about 5 hours to complete it!


Next is a pillow made by Lisa Hale. She used our designer fabric for the ruffle, wreath, and ribbon. The wreath was made with a Big Shot die. Yes, you can put fabric thru a Big Shot, it will actually cut thru quite a few layers at once!


I love this project done by Angela Khan! She used a bible verse as her theme, and then framed it. There is so much detail in this project, including distressing, sponging, punching, etc! As you can see, we have very talented stampers in our group!


One more post coming soon, with the last of the holiday gifts....

Catching Up Some More!

I'm still catching up, and will be for the next few posts! The projects I want to show you today are gifts my upline, Mary Hall, made as door prizes at her holiday party. Such awesome ideas!

The first one is a gorgeous jar that she embellished with decor elements, ribbon and vintage brads.


Next is an adorable frame, also using decor elements, on the outside of the glass. There is designer paper inside. The button is on the outside. This is the prize I won!


Isn't this star gorgeous? I think it was done with a Big Shot die, and designer paper. The picture really doesn't do it justice.


This is a glass cube that has decor elements on the outside, and lights on the inside! Absolutely beautiful!


And last, another framed project. The ornaments are done with a decor elements stencil, and it looks like the ribbons are on the outside of the glass. We have some fantastic decor elements, as you can see from all of these projects!


That's it for today. Stay tuned for projects that were done for our gift exchanges.


Catching Up

I am so far behind in posting, I've decided to just play catch up for the next few days! The first things I want to show you are three of the projects from my Holiday Gifts Class. I know, this doesn't do you any good right now, but you could get started on next year, right?

The first project is an adorable hand sanitizer holder. The reindeer is made with all punches, except for the antlers, which are a Big Shot die. This idea was perfect because...


when I was looking for a holiday hand sanitizer, I found this reindeer one from Bath and Body Works! So I actually think I decided on that first, and then used the punched reindeer for the front of the box.


This next project is a cute little post it note holder made with the Two Tags die. The snowflakes are also from a die. I used the Crop-a-dile to punch the hole for the ring, and I punched thru everything at once, including the post it.


Here's what it looks like when opened. It's a great size to keep in your purse.


And last, a little set of gift tags. I used these as pre-Christmas gifts, for people that I exchanged gifts with before the holidays. Then they had something they could use.


So that's just a few leftover Christmas ideas!


Holiday Banner

I want to show you an adorable, and easy, holiday project. I have not personally made this (yet), but when I saw it at my upline's house, I knew I had to take pictures so I could create it someday! It's a NOEL banner. Take a look...


This picture doesn't really do it justice. Luckily I took a close up of each letter (see below). The scallop squares are done with chipboard and designer paper, run thru the Big Shot with the Scallop square die. The backgrounds behind the letters are done using the Petals-a-Plenty embossing folder. And the letters are from the Serif Essentials Alphabet die. Punch out the snowflakes and add a Basic Rhinestone to each one. Using the Cropadile, add 2 jumbo brads to each square and string with ribbon. I LOVE it!


More Holiday Gifts!

I know I promised awhile ago that I would post some more of the holiday gifts from the parties this past season. But then other things happened, I went to Leadership, and here it is, almost February! But better late than never, I always say!


Here is a beautiful framed picture, done with Designer Paper and Decor Elements! So easy, yet so nice! (yes, that big snowflake is designer paper!)


These are the blocks that were featured in our Holiday Mini Catalog. They were covered with Designer Paper and the letters are Decor Elements. The box is also covered with DP. The blocks have different elements on each side.


And this is a candy jar decorated with Decor Elements. Besides the candy canes, inside there was also a stamped candle, plus a set of earrings made with our Filigree Brads ! So cute!