Showing posts with label Hand Stamped Projects. Show all posts

Look What They Made!

Yes, I know it's been a whole month since I've touched my blog! That is what happens when holiday prep time rolls around and you have to do all the shopping, decorating, card making and sending, wrapping, baking, etc, etc, etc! You know how it is! And that's on top of all the other every day things. But now that we can finally take a breather, I am back! I want to show you the gifts we exchanged at my downline holiday party!

This first one is mine. I got one of those hollow glass blocks at the hardware store and drilled a hole in the bottom. Then I pushed a strand of 50 white lights inside. On the outside I used one of our Decor Elements - it went on very easily! And then I wrapped a ribbon around the block, made a bow, and added some glass balls. The block is frosted, so it's really pretty when you plug in the lights.


This Advent Calendar was made by Toni. Isn't it amazing? She painted a cookie sheet and then decorated 24 favor tins. They are attached to the sheet with magnets, so you can pull them off and put candy inside. She also drilled a hole at the top of the sheet so you can hang it on the wall. I LOVE it!


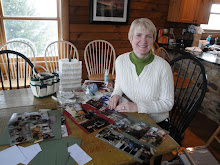
Pam made this adorable magazine holder and tray set. She painted the tray and then Mod Podged designer paper onto both pieces. Isn't it great! I have to tell you that this gift was stolen as many times as possible during the gift exchange!


Stacey made this clock and I was lucky enough to end up with it! I love how simple it is with the flowers and the word "Life". It's hanging in my stamp room right now!


This beautiful artwork was done by Eloise! It's hard to tell from this photo, but the frame is kind of like a shadow box and most of the elements are 3-D. Isn't it amazing all the things you can do with stamps and other accessories? Eloise also used the Big Shot for the words.


And this gorgeous work of art was done by Blake. Also hard to see, but the flowers have a dimensional effect because she stamped them twice, overlapping just a bit. The gifts were simply wonderful and everyone put such thought and effort into them. We had a great time exchanging them, and it made me want to get back into the stamp room and make some of them myself!


Glass Ornament in a Box

I got a lot of use out of my Big Shot with this project! The box is made from 4 scallop envelopes, cut out with the Big Shot. I wheeled tissue paper, using the Bold Snowflakes jumbo wheel, and Baja Breeze ink, and tucked it into the box. Then I wrapped it with Ski Slope DP and red grosgrain ribbon. The Baja Breeze scallop square was made with the punch, and there is a small Felt Flurry Snowflake to top it all off.


The ornament is one of the glass ones you can buy at the craft store. I made the snowflake on the outside with the Big Shot and cut it out of our white vinyl. (Did you know that we carry sheets of vinyl in 4 different colors, so you can create your own decor items?). I put some shimmery red packaging strips inside the ball, added a silver cord to the top, and that was it! This is really 2 gifts in one, don't you think?

Peppermint Jar

This project was very cost-effective, as it recycled glass jars! It's actually a Starbucks frappucino jar; my upline had a bunch of them and was giving them away. So of course, I took her up on the offer, not knowing what I'd do with them, but figuring I'd come up with something! You really could use any jar for this project, so before you throw them away, take a closer look and think "hmmm... what can I do with this?"!


All I did was layer a piece of Real Red card stock with a piece of Ski Slope Designer Paper, then wrap it around the jar. I used the large Felt Flurries snow flake, and added a punched circle to the center, then attached it to the front of the jar. On the lid I used 2 different sized circle punches and layered the card stock and DP again. (You can't see it.) Then just add your candy and you're all done!

Scallop Envelope Gift Cards

Here is another project from my Holiday Gifts class. I used the Scallop Envelope Die with my Big Shot machine and cut four envelopes from Ski Slope Designer Paper (found in the Mini Catalog).


Then I made 4 matching gift cards to fit inside each one. The DP makes coordinating the colors so easy! I put them all together into a cello bag and tied it off with the stitched Chocolate Chip ribbon. Some of the class attendees were going to use the package as a gift, but there were also a few that were going to use the cards on their own gifts!

The Big Shot is a fantastic tool/toy and I am having a great time playing with it! What's really fun is how some people come up with "out of the box" ideas for the different dies. Thank goodness they share with the "in the box" thinkers like me!


I'm back - Believe it or not!

Oh my gosh! It has been a VERY long time since I have posted anything! You miss one day, then another, and then a week, then two weeks, and then you just start wondering if you should even have a blog! I have a fairly good reason for my absence, and it's really not pretty! It has basically taken over my life, and I am just beginning to resurface. So you're probably wondering, what the heck happened? Well, it's really not a huge crisis, except in my little world. In my 25 years of marriage and having our own home, this has never happened before... mice found their way into our house! Yuck! I still get the heebie jeebies when I think about it. I HATE mice more than anything else in this world (except maybe snakes). Not only do I despise them, I am afraid of them. Which my family thinks is quite hilarious, to say the least. So anyway, luckily they are only in my basement, but so is my stamp room. They got into a bunch of my stamped samples and chewed them up, ate my chocolate, and basically made my life a living hell! Because I am afraid of them, that meant I had a very hard time going into my stamp room, let alone doing any stamping there. So I haven't gotten much done in the past couple weeks because I'd just run in there, grab a few things to work on, and try not to venture down there again for the rest of the day! My husband has had to do "mouse checks" every morning to look at the traps and see if we caught any (which we did). Then, on top of it all, the little buggers wreaked havoc in my storage room. It was on my list as a winter project to totally clean that room out, go thru all the boxes, etc, since it had been a few years. Well, that project got pushed up to the present, so I've been getting up the courage to go in there everyday and clear out another section. I've gone thru just about every box and shelf, and have transferred everything into plastic bins. (Target and Lowes love me right now!) And I have to say, it's been very liberating. You would not believe how much stuff I am getting rid of, and boy does that feel good! Purple Heart is coming on Tuesday, and I hope they bring an extra big truck! So that is my life story, whether you wanted to hear it or not! And now I am going to show you two of the projects we did at my Holiday Gifts class, and I will post the rest over the next few days.


I think this was my favorite project. It's a photo/note/recipe holder. I painted a wood block that I got at Michael's with acrylic paint (just used a sponge brush). Then I cut Old Olive and Chocolate Chip card stock to cover the sides, and glued them on. I added Frosty Day Designer Paper to 5 of the sides, leaving the bottom with just plain card stock. I used the new felt ribbon from the Mini Catalog to tie around the block (love that ribbon!), and added a clip to top, attaching it with Sticky Strip. This was so easy! I am definitely making more of these!


This is a bookmark, and I copied it from a project we did at Convention. I just changed the colors a bit. The scalloped square is chipboard, from the On Board Something Seasonal set. I used Old Olive Craft Ink to color it. The flower is from the Eastern Blooms set, and it's layered on top of Urban Garden DP. My favorite part is the Filigree Brads, both in the center of the flower and on the end of the ribbon. This was another quick and easy project, the best kind!

Sweet!

Surprise! Posting 2 days in a row! I know, I'm flabbergasted too! But I wanted to show you another sample done with the Big Shot. This topper is done with the Top Note die, and it's the same die I used on the card in the previous post. It's perfect for a project like this.


On the front of the topper I used the Ronald McDonald stamp set, Say It With Scallops. And that set was designed to go with the new Scallop Square punch. Don't ya love it when things go together like that? Then add the cello bag of candy, and you have a little goodie bag/gift! Easy!

A "Blinged" Purse!

One of my friends in my downline saw an adorable purse on a blog, and suggested that we make them as convention gifts. (We are gearing up for the Stampin' Up! Convention in just a few days!) Toni stamped and added the embellishments, and I sewed them. It was quite a production, late into the night one Saturday! But they turned out great, and everyone loved them. They will be perfect for our swap cards.


We did 2 versions, both stamped with the Brocade Basics stamp set. We used Craft Ink, the leaves on both with Certainly Celery. The flowers on the one above was stamped with Regal Rose, and the one below with Apricot Appeal. Toni added the Felt Fusion Flowers, attaching them with Rhinestone Brads.


We added a ribbon embellishment at the bottom, using the same color ribbon as the flowers. The handles are made with 5/8" grosgrain ribbon, in Old Olive. (The Certainly Celery was too light.) Didn't they turn out cute? To see the tutorial that we used, check it out here.

Designer Paper Purse - Wow!

My upline, Mary, who is sooooo creative, and one of the best stampers I know, always makes me a gift for Convention. This year she really outdid herself! This is a purse, which will be perfect not only for Convention, but to hold cards once I get home, made out of Designer Paper!


All the paper pieces are laminated, and then she punched the holes using her Rubicoil. And don't ask me how long it took her to thread all the sides together! Isn't this awesome? Mary will be the first to admit that she didn't design this project, and that she purchased the tutorial from another demonstrator. So I cannot even tell you exactly how it was made. I am just thrilled that she took the time to make one for me, AND she filled it with goodies for Convention! The big joke about me is how much and how often I eat, so she was sure to put a lot of snacks in my new "purse"!

After some requests, I was able to find out where my upline purchased the tutorial! It's on Julie Edmonds blog (great blog, by the way!) and you can find it here.

WOW's from Amy!

My dear friend, scrapbooker and blogger extraordinaire, AND downline, Amy Sheffer, recently sent me a package for my birthday! Her cards alone are works of art, as you can see below! No detail is forgotten when she does a project. I have "stamping and scrapping" envy when I see her work! Anyway, isn't this the most amazing card you've ever seen? You must check out her Blog, and you will see what I mean!


So, that is the card, which would have been gift enough! I really want to frame it! But she also sent me these embellished blocks (which were supposed to be a Christmas gift, but wasn't it worth the wait?!) I just love them! The glittered chipboard letters, felt flowers, and again the attention to detail. Now I have to find 3 perfect photos to attach to the top of the blocks!


I just had to share these with you! So after you visit Amy's blog, Pickled Paper Designs, I hope you will occasionally come back and visit mine, just to humor me!


Good Things Come In Small Packages!


Here is an adorable little box that is so easy to make, yet looks like it took a lot of time! I used a 6 3/4" square of Blush Blossom card stock, and scored it on all 4 sides at 2 1/4". This will give you nine 2 1/4" squares. In the 4 corner squares, you score diagonally both ways, then trim off the outside triangles, so the corners are flat rather than pointed. The next step is to fold those corners outward, and that's how you get the outside triangles that are tied together with ribbon. Before you add the ribbon, stamp the 4 flat sides. I used the BoHo Backgrounds stamp, with Groovy Guava ink. Then punch 1/8" holes in the folded triangles, string your ribbon thru and tie a knot. For the accent on the front, I stamped the circle image from BoHo Backgrounds on Whisper White card stock with Groovy Guava, then punched it out with the Scallop Circle Punch. Stamp it again on Groovy Guava card stock and punch with the 1 3/8" circle punch. I used the One of a Kind set with the BoHo Blossoms Punch to create the top flower, then added a Fire Circle Rhinestone to finish it off. Add your gift to the box, and voila! You're done!

I am heading out tomorrow for the Stampin' Up! cruise to Bermuda - woo hoo!!! So I won't be posting again until I return. I hope to come back with lots of inspiration for many projects! I think my husband and I will consider this our 25th Wedding Anniversary trip, and how nice that Stampin' Up! is footing the bill! See you soon!

The Little Things in Life


This is a very easy but elegant gift, and inexpensive too! I was inspired by one I saw on Patty Bennett's blog. I got one of those unfinished wooden frames from the craft store for $1.00 (or maybe it was $2.00?). I painted the inside and outside edges with acrylic paint and a foam brush, and let it dry. Then I traced the frame onto Designer Paper, cut it out and glued it right onto the frame. I stamped the swirls from "Priceless" directly onto the Designer Paper with Craft Ink and let it dry. Then I Mod Podged over the whole frame to give it a glossy look. For the little popped-up flowers I just stamped them onto a coordinating piece of DP and Mod Podged them as well, added brads and used dimensionals to attach. I bent them up a little bit to give them some pop. I did the same thing with the "Priceless" greeting and attached it to a brass hardware frame, and then onto the front with dimensionals. I had found this quote and loved it, so I just printed it onto card stock and cut it to fit inside my frame. Finally I tied a piece of satin ribbon around one side of the frame. I now have this piece displayed on my front hall table and I LOVE it! I made a few of these as gifts for the holidays, and I think everyone liked them too!

"Enjoy the little things in life, for one day you'll look back and realize they were the big things."

For your "Magnetic" Personality!

This is a metal strip that Toni got at Ikea. She covered it with Designer Paper. It came with the 3 big magnets that have the Pretties flowers attached to the front. Then she created smaller magnets using Build A Brads. Isn't that a cool idea?! I am going to hang this over my desk and then I can put my urgent "To Do" post-its on it so I don't forget all the pressing things I have to do!

Let It Snow!


This beautiful box was decorated by Toni! She wheeled a piece of white card stock and covered the bottom part with it, and then covered the lid with designer paper. Around the edge of the lid she added homemade icicles! To create the icicles, all you do is squeeze out a line of Crystal Effects onto wax paper, and pull some of it down to make it look like ice. Sprinkle glitter on it, lightly, and let it dry. Then peel it off the wax paper and glue it onto the box. The big snowflake is chipboard embossed with silver powder. To really add pizazz, you mod podge the whole thing. Don't ya just love it?!


Here is a better view of the top.


Inside the box Toni added a coordinating chipboard ornament to complete the gift. This is such an elegant way to package a gift! The boxes are available at craft stores and you can sometimes even find them on special. And even better, the box can be used to store things or even as a decorative accent after the gift is opened!

Gorgeous Gift Set

Here is another gift from my downline Holiday Party! Beth covered the tin purse with Apple Cider Paper around the bottom, but then she painted the lid. I haven't tried that, but it sure seems easier than trying to make a pattern to fit the paper around the handle! Inside the tin she had a Bitty Board Book, and each page protector had designer paper in it already, so you just had to add photos. She also covered some journals, and she mod-podged the outside of them. That way when you carry them in your purse, they will be able to withstand some of the abuse from riding around with you all the time! It's too bad the Apple Cider paper didn't make it to the new catalog, but Western Sky would probably work just as well. If you haven't come by to get your new catalog yet, be sure to do so! There are all sorts of fantastic new Designer Papers in there, and I can't wait to use them!