Showing posts with label Cards. Show all posts

Just a few cards

Today I want to show you just a few cards that were done by the girls in my downline. We meet once a month to talk a little business, do a card swap, and stamp! It's a lot of fun and I really enjoy getting to see them every month. They are a talented group of ladies!

This first one is the perfect masculine card. The stamp set is "Need for Speed". The background was done using the Houndstooth Embossing Folder, and then sponged with the same color ink. Very striking!


Next is a beautiful autumn card using the Day of Gratitude stamp set. Very simple, and I love the colors!


This card used the Flower Fest stamp set. The images were stamped on tissue paper, and then that was adhered to the underlying card stock. Okay, I know that technique has a name, but I can't think of it right now. Does anyone know?!


And finally, a card using the "For Everything" set. I have resisted buying this one, but every time I see a sample, I start to rethink that! What I love about it is that even though it's a line image set, you really don't have to color it. (I don't like to color...).


So there you go, just a few cards for your enjoyment! See you next time...


September Stamp Camp Cards

Since tomorrow is October Stamp Camp, I decided I should hurry up and show you what we did in September!

This card uses the single stamp called Triple Treat Flower. The neat thing about this image is that it fits 3 punches, the Fancy Flower, the 5 Petal Flower, and the 1/2" Circle. So we stamped it in 3 different colors, then used the 3 punches to make the layers. Added a rhinestone brad to the center circle and it was done. If you look closely at the background piece under the flower, you can see how we made decorative score lines using the new Simply Scored tool - so easy! And the white strip is embossed with the Snowburst embossing folder and the Big Shot.


The second card uses the new Designer Frames embossing folder. The nice thing about this is that it was made to perfectly fit the Extra Large Oval punch. So for the inside image, we just stamped the flowers, punched it out, and laid it inside the embossed circle! The Designer Series Paper is Spice Cake - so gorgeous!


Stay tuned for this month's Stamp Camp cards - they are really cute!


More cards!

So how am I doing? I've actually been blogging! I put it on my daily "To Do" list, which means it has a better chance of getting done. Now why didn't I think of that before?!

The first card I want to show is you is a favorite! Using the new Blossom Bouquet Triple Layer punch, Essel (who is in my downline) made this awesome card! She punched and layered and used the Big Shot and she said it was a lot of work. (Plus she has a new baby boy, so don't ask me how she found time to do this, I don't know!) But it was well worth the effort, don't you think?


This is a moveable card made by Pam, also in my downline. When you pull up on the top tab, the greeting in the middle comes up too. Very cute!


And for the last card of the day, this one uses the new Delicate Doilies set. Don't you love the colors? I sure do! This card was made by either Stacey or Courtney, both in my downline, and both very talented! If either of you want to claim this card, let me know and I'll give you credit! (We used to put our names on our swap cards, but then decided that we could use them if we didn't do that, so now I have to try and remember who made which card...!)


Happy Stamping Everyone!


I'm Baaaaack!!!!

Yes, believe it or not, I'm back! I haven't posted since January, and it's been on my mind lately, so I just decided to jump in and blog today! And hopefully now I'll keep up with it, at least more than once every 9 months!

For those of you that don't know, my Dad passed away in April, and he had some difficult months before he left us. I have never had anyone that close to me pass away, so it was emotionally draining. I've found that people grieve differently, and for me I lost all desire to create or even spend time in my new craft room. So I gave myself permission to take some time off, and that has helped. The only thing I felt like doing was scrapbooking, and it was very therapeutic to be spending time with my photos and and archiving my memories. So thank you to all my very dear family and friends for being there in my time of need. I miss you Dad.

Okay, I have also decided that my blog will not only be about stamping and scrapbooking, I will also post about other random things going on in my life. Which means I will be showing you the final product of our big construction project, which was finished this spring! But that will have to wait until another post...

Today I want to show you just a few cards.

This one I made for a swap and I CASE'd it from the catalog. You're allowed to do that, and I've been doing it more and more! It uses the "It's a Wrap Occasions" set. Check out the other samples for this set on page 59 in the catalog. I've also made the cute candy box and it's pretty easy. They used the Matchbox die and just cut the lid to make the flap opening. (I guess I'll have to take a picture of the one I made!)


Yep, here's another one I CASE'd! If you look closely you can see the score lines on the Lucky Limeade piece of card stock. I used the new Simply Scored scoring tool and it was a breeze!


This was one of the cards we made at my August Stamp Camp. It uses the Flower Fest stamp set. What I love about this set is that just about every image has a matching punch! And, since I don't like to color, it is very easy to just sponge to get a watercolor look.


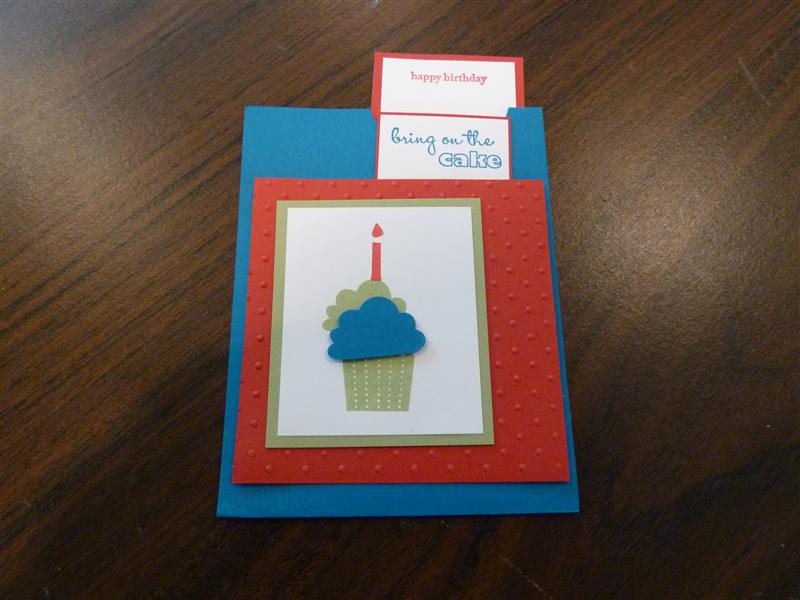
And finally, a great birthday card that is soooo easy! I like this one so much that I used it for my son's birthday back in July! Talking about matching punches, this card uses the "Pennant Parade" stamp set and the Petite Pennants Builder punch. Perfect for the lazy stamper, like me.


Well, that's it for today. It's my DH's birthday so we are headed out for lunch! I promise I will try to blog more often. Maybe now that school is starting, I can get back on a schedule. See you soon!


Polka Dot Birthday!

This card was made by Stacey Randolph. The background was done using the Polka Dot embossing folder on the Big Shot. I like how it coordinates with the designer paper. This stamp set is from the Sale-A-Bration catalog! Only 2 more days and it will be gone forever!


Fantastic Window Cards!

It's been awhile since I've used acetate, and made a window card. Toni Ellison did this card for a swap, and that gave me the incentive to try out this technique again! The front of the card is framed acetate. She stamped the butterfly images and the swirly greeting on the outside of the card with Stazon ink. Then on the opposite side, she mixed reinkers with Crystal Effects and painted it inside the butterfly, then added glitter.


This is actually a tri-fold card, so when you open it up, you can see how the butterflies are on the front window of the card, but the "Thinking of You" and other flowers are on the inside.

Then you open the 3rd fold, and there are more images, plus a place to write your own message. Isn't this just cool?


So I decided we needed to do a card like this at Stamp Camp. I made my card a little bit smaller, just to make my limited supply of acetate stretch further! I stamped the one big flower on the front with Stazon, then painted and glittered on the other side.


Inside the first fold I stamped the birthday greeting and other flower images. This stamp set is new and is called Garden Greetings. The ribbon is attached at the back of the card and when you close it, I just tied it with one little knot, bringing it to the front thru the punched slot.


And then here's the inside of the 3rd fold. Just a few more flowers and room for my message. I know this card looks hard, and it does have a lot of steps, but it went together pretty easily. The worst part was cutting out the frames. I used my Fiskars cutter, but doing a lot of them was a bit time consuming. My friend, June, gave me a great idea, and I plan to try it out soon. Rather than cutting out all those frames, she suggested I use a Big Shot die, like the scallop circle, to make the frame. Now wouldn't that be much easier?


So, I hope you liked this card! I think my Stamp Campers did!


ENJOY!

This bright and cheery card was done by Pam, who is in my downline. I usually forget to do square cards, but I do love them, and this one is no exception! Plus she used one of my favorite stamp sets, "Enjoy Every Moment"!


Pam used so many different elements to tie everything together. And to finish it off, I really like the paper clip with ribbon on the side. This card just says "be happy!" to me! How about you?


More Season of Friendship!

More samples using the Season of Friendship stamp set! The next one was made by Stacey Randolph. I love how quick and easy this card is, yet it still has extra features that pop out. Like how the leaves are stamped and then punched with a circle punch, then attached with dimensionals. And of course, the Autumn Vine DP - love it!


The next card was made by Blake Aubertin. She added some embossed leaves (look closely) for that extra wow factor. And there's that Autumn Vine DP once more! I like how she added the greeting, making it almost like a tag with the punched corners.


So now, don't you feel like you NEED the Season of Friendship set?!

It's a Season of Friendship!

When I first saw this stamp set, Season of Friendship, I thought I didn't need it. Then I came across so many great samples, I went ahead and got it (of course)! And I'm glad I did! I made these 2 cards, and they basically show how you can do it up very simply, or just by adding a few little things, it becomes more of a wow!

We made this card in my Stamp Club last month. The DP is Autumn Vine, from the Holiday Mini. What beautiful paper! If you look closely, I popped a few of the leaves up with dimensionals. The greeting is punched out with the new Wide Oval punch. I also like the square size of this card.


This card was the first one I made with the set. Very simple, just stamped, and added the greeting- attached with brads. A good one for when you need a card in a hurry! (not that that happens to anyone, right?!) Tomorrow I'll show you 2 more samples, so stay tuned!


That Much Loved Pink and Brown Combo!

Today I'm showing you a card done by one of the girls in my downline, Chelsey Gregory. She lives about 2 hours away from me, but occasionally participates in our monthly swaps, and I'm so glad she does. She has some great ideas!


I love the pink and brown color combination, especially with the little bit of blue added in there. And then to top it off, she put that little extra touch by dry embossing the pink background piece. The stamp set Chelsey used is called Fun and Fast Notes. What a fun card!

Stitched Exotics

This card was made my one of the girls in my downline, Pam Ivey. She used the Stitched Exotics stamp set, which I don't own, so I was happy to have a sample done with that set!


You know that I love quick and easy, and this one fits the bill. By using Designer Paper as her background, all Pam had to do was stamp the flower and center flower, cut them, add the ribbon, and voila! A beautiful hand-stamped card that anyone would love to receive! These colors are just gorgeous too!


Just Flying By!

This is the card we did at my Open House back in August. I love the color combination of Chocolate Chip and Baja Breeze (one of the new In Colors). The dots are designer paper, and the scallop is done with the Scallop Edge punch. I just stamped on it after I punched it.


The butterfly is from the Flight of the Butterfly set, and it gives you the perfect excuse to use the Stamp-a-ma-jig! My favorite part of the card is the Faux Bow! I used taffeta ribbon, and all you do is make a loop with one piece of ribbon, then wrap a smaller ribbon around the middle. It's "cheating" at it's best, and it also uses a lot less ribbon that way!

Inspired By Nature

I'm baaaack!!! Where does the time go? When school started, I thought I'd have some extra time to get things done. But no! Since my kids are teenagers, they are pretty low maintenance in the summer time. They sleep a lot and there isn't nearly as much driving around and going places as during the school year. Well, I had forgotten that little tidbit! Anyway, not that you care, but that is my excuse THIS time for why I haven't posted! I really need to get on a schedule!


This card was done with the new set called Inspired By Nature. The silhouette sets are really growing on me. For this design all I did was emboss the image on designer paper. I love the look! I cut out the DP with the Big Shot first, so that made it really easy! (I am having a lot of fun playing with the Big Shot too!) The greeting was punched out with the new Wide Oval Punch, which you are going to want! I think this card looks like it took a lot longer to make than it really did, which is a bonus in my eyes!

Goodbye Roses...

Here's one last look at a beautiful retiring set, Wild Rose, and the Designer Paper, Le Jardin. We made this card at my July Technique Club, featuring the Color Spritzer. See the mists of color on the bottom 2/3 of the card? That's from the spritzer! At my clubs I am going to try and show everyone how to use some of the accessories in the back of the catalog, especially things like the spritzer, which some of you didn't even know was in there!


Wild Rose is a 2-step stamping set, so the bold background of the flower was done with Bashful Blue, then layered with Brocade Blue. The leaves are in Mellow Moss and Always Artichoke. We cut out both pieces, layered them, and attached to the front of the card. I love the Le Jardin paper and I thought it went well with the rose. I hate seeing my favorite things retire, but oh boy, wait until you see the new Designer Paper! It's better than ever! I can't wait to get my hands on it!

So Elegant!

Who says things have to be fancy and frilly to be elegant? This card would prove that theory wrong! The main image is from the Carte Postale stamp set, and it's perfect just on its own. (The greeting is from All Holidays and is not retiring.)


The card base is Basic Gray, with Basic Black layering. The images are stamped on Shimmery White card stock, kind of hard to see in this photo. The torn edges on the layers gives the card just a little bit of texture. And voila! Just beautiful!

Isn't this a WOW?

This was one of the very favorite cards at my Retired Card Class! And you can see why! It uses 3 different stamp sets - So Much, Print Pattern background, and It's Your Birthday. Once again, surprise!, an awesome card using the So Much set! Now do you see why you should have it?! The dotted circles and the flowers are from that set, and by cutting out the flowers and adding the brads, they really pop at you!


And who would have thought that River Rock and Basic Black could make such an eye-grabbing color combination? At first I wasn't too crazy about River Rock, but it has really grown on me, and it really makes a nice neutral color. Wouldn't you agree?

Give Thanks for the Simple Things

Isn't this a beautiful card? I can gush over it because I didn't actually create it! My friend, Deb, made it, and she is so talented at watercoloring, as you can see! She used the Give Thanks set and the Flannel Plaid background stamp. I knew I wouldn't be able to make mine look as nice as hers, so I used this one as a sample. However, I did find a trick that helped mine look better than usual...


The image is stamped on Watercolor Paper with Black Stazon Ink. For the apples I used a Real Red Marker and outlined them. Then I used the Aquapainter and dragged the color to the center. My shading didn't turn out quite a nice as Deb's, but it was certainly nicer than my normal "looks like a pre-schooler did it" attempt! So try that technique. It worked pretty well on the smaller apple image, not quite as well on the pail. So I think the best way for that was to use the Ink Refill with the Aquapainter, just dip the tip right into the ink, taking just a little! And don't worry about going outside the lines! That's what watercoloring is all about!

Have Your Cake and Eat It Too!

This card uses the "Eat Cake" stamp set, and I'm really sorry to see it go. It has lots of other fun images besides this one, including an invitation stamp. The cake with plate is one stamp, and the candles with flame is another. To color the images, we used markers.


The background is done with Word Search. There are tons of words and word combinations on this stamp, and I even got side-tracked trying to find them all! This is another one of those stamps that I really didn't get much chance to use - I think I have too many stamps! Either that or I just need to spend more time in my stamp room!

Sweet Shapes!

Everyone in my class loved this card! And most had never seen the Sweet Shapes set before. Well, that would probably be because I had never used it before! And I don't know why, it's really an awesome set! Look at the group of rectangles in different shades of pink. That is just one stamp, and by the miracle of rubber stamp making, somehow it just comes out that way when you stamp it!


The flower was stamped and colored in with a Pink Passion marker. Then we cut it out, added a brad and attached with a dimensional. (In case you haven't figured it out yet, I love dimensionals!) So, another quick and easy card! That was my theme for the Retired Card Class, since most of us have very limited stamping time!

Lots and Lots of Circles!

If you like dots and circles, you'll like this card! This is a fun one... It's kind of hard to see, but the front of the card has a punched-out circle, and the image from Circle of Friendship is stuck in there, but attached to the inside of the card with a dimensional.


The front piece is stamped with the Dotted background, then wrapped with the double-stitched Blue Bayou ribbon. The card is cut lengthwise, so it opens from the bottom. When I did my Retired Card Class, I just put out the whole Circle of Friendship set, and they could pick which greeting they wanted. There are lots to choose from, and a couple girls even mixed up the outer circle from the inner circle, using 2 different stamps. I love it when my class attendees come up with things I hadn't thought of!